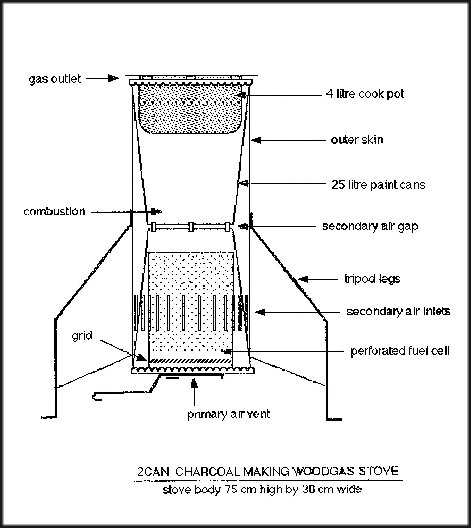
Elsen Karstad's Charcoal Making Wood Gas Cooking Stove
Elsen Karstad's Charcoal Making Wood Gas Cooking Stove (Sept 19/97)
Date sent: Wed, 17 Sep 1997 To: stoves [at] crest.org From: elk [at] arcc.or.ke (E. L. Karstad) Stovers;
I've been concentrating on what I feel is a practical everyman's charcoal making woodgas stove that could be easily produced in E.Africa's informal sector.
To date, I've simplified the stove to a minimum using materials readily available.
An operator familiar with the stove can consistantly convert thumb-thick dry wood fuel to 20% charcoal and boil off almost (not quite equal) the same amount of water as the weight of fuel. FOM ranges from .85 to .95. Burn time is typically between 1hr 30 min. to 1 hr. 55 min. After some 60 trials with various configurations, I'm pretty happy with this.
I've costed the stove in the range of USD 9 to 11.00 dependant on labour charges at 30% of total, and assuming that electric welding is necessary, though it might not be with skilled metalworking using rivets.
Familiarisation with the stove's operation is necessary in order to avoid some very impressive amounts of smoke. Wind resistance is good.
Turndown (min-max power) is good and quick- maybe 4 out of 5 when compared with gas cooking.
Flame holding is not a problem, though again, the operator must understand a few basic techniques.
I've not tried wet wood, but assume this would negatively affect flame holding. I've used both hard and soft woods in the stove with little observed difference other than bulk density.
The stove incorporates a perforated fuel cell insert attached to the removable bottom 'lid' which is 2 cm distant from the inside wall of the stove. This cell has a grid raised 2 cm from the bottom, and an adjustable primary air vent is built into the bottom (lid). Average fuel load is 4.5 kg of loosely packed dry wood cut neatly in lengths of 27 cm, which is the inside depth of the fuel cell.
The two 25 l. paint cans, which have had their bottoms cut out, are slightly narrower at the base than the top. These opened bases are joined together at five points with narrow strips of metal teaving a 4 mm gap (the secondary air slit) between the two cans. This slightly hour-glass shaped tube is 75 cm high, 30 cm diam at either end and 28 cm diam at the middle secondary air inlet.
As per Ronal's suggestion, a skin of sheet metal is wrapped around the entire stove from top to bottom and sealed in place at both ends where a reinforcement rib is located just below the rolled lips of the cans.. This acts as a partial insulator, a wind shield for secondary air, and a secondary air pre-heater. Air enters the space between the two skins (the 'waist of the stove) via 24 3mm wide by 8 cm long slits cut through the outer skin approx one third up from the base of the stove. These cuts are made with an angle grinder, though several other less sophisticated methods of making secondary air inlet holes at this point could be used.
An alu cookpot of 28 cm diam (4.5 litre capacity) is inserted into the top of the stove. This is postioned within a cut-out lid (one of the lids that come with the 2 orig. 25 litre paint cans- same as the bottom which supports the fuel cell) with three rolled tabs to hold the rim of the pot 1.5 cm above the stovetop. The gap between pot and cut out lid is 1 cm.
Three well splayed legs hold the stove about 10 cm above the ground, providing enough stability to stir porridge without rocking the stove.
The stove wall (outer skin) above the mid point level of the secondary air vent does get very hot & could be a hazard to small children. If a clay or cement inslation isn't added (which would make the whole stove virtually immovable & fragile), then maybe chicken mesh could be supported some distance away from the stove on a simple frame, or a roundbar ring?
I also need to affix handles on the stove at two locations to allow the stove to be inverted in order to pour out the hot charcoal at the end of the burn. This can be smothered in a small 4 or 5 litre paint can with sealable lid.
One last detail is removing the pot- as hot gasses are vented at the rim of the pot, grasping here with fingertips in order to remove the pot is not recommended. I've made a simple ring out of round bar with two 'T' shaped handles that the pot is inserted into while on the stove. This is also a handle that can be grasped while stirring very thick almost cooked maize-meal in order to stabilise the stove (the final product is a heavy cake). Should the flame in the combustion chamber fail, the pot can be removed and flame usually re-establishes immediately with the inrush of air through the open stovetop. Primary air vent is cracked open a bit more and the pot is re-inserted.
And, hey- this stoves LOOKS good!
